If you’re craving a refreshing dessert that’s easy to make, you’ll love this Strawberry Shortcake Icebox Cake! This no-bake treat combines fresh strawberries, rich mascarpone, and soft ladyfinger cookies in a delightful way. I’ll guide you through each step to create a dessert that looks great and tastes even better. Ready to impress your friends and family? Let’s dive into this simple and sweet recipe!
Why I Love This Recipe
- Refreshing Flavor: The combination of fresh strawberries and creamy mascarpone creates a delightful contrast that is perfect for warm days.
- No-Bake Convenience: This icebox cake requires no baking, making it an easy and quick dessert option for any occasion.
- Beautiful Presentation: The layers of strawberries and cream look stunning, making it a showstopper for gatherings.
- Customizable: You can easily swap strawberries for other fruits, allowing for endless variations based on your preferences.
Ingredients
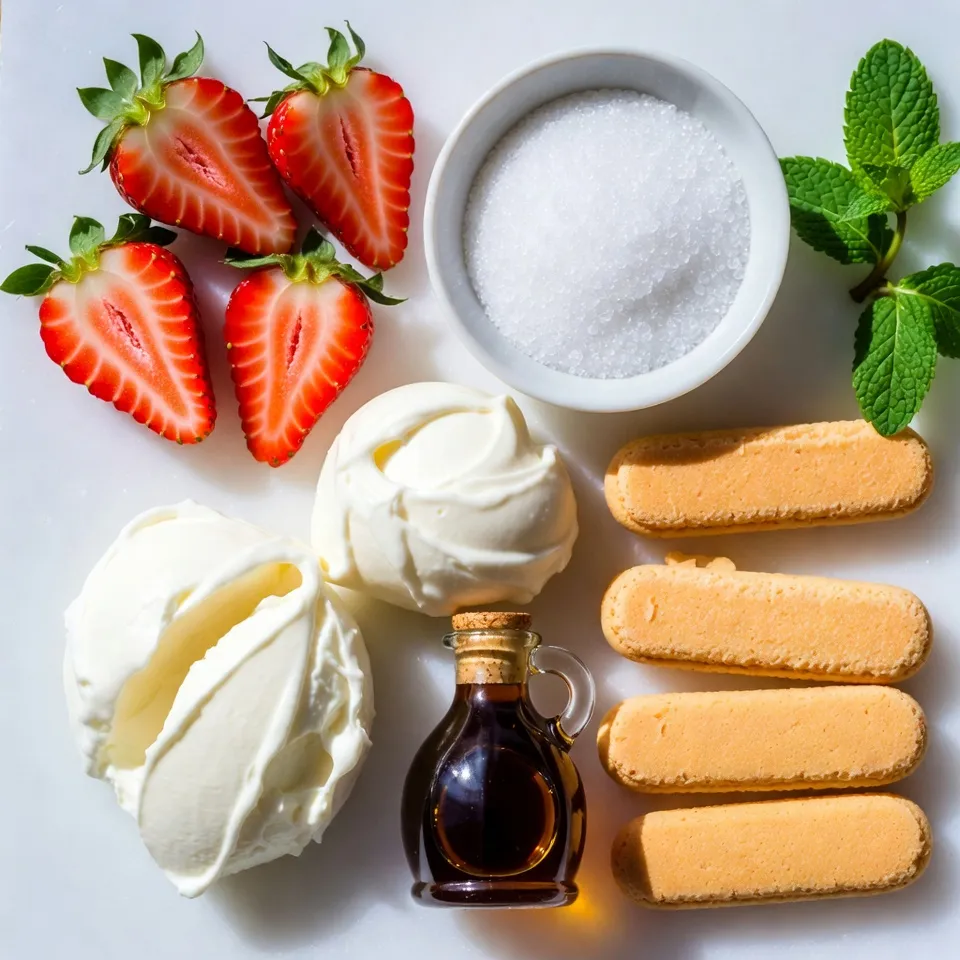
List of Ingredients
– Fresh strawberries: Use 2 cups, hulled and sliced. This gives the cake its sweet and fruity flavor. Choose ripe berries for the best taste.
– Heavy whipping cream: You need 1 cup. For the best results, chill your mixing bowl and beaters before whipping. This helps the cream whip up nicely.
– Mascarpone cheese: Use 1 cup. Look for a smooth and creamy texture. This cheese adds richness and depth to the cake.
– Vanilla extract: You need 1 teaspoon. Always use pure vanilla extract. It enhances the flavor and makes your cake taste more special.
– Ladyfinger cookies: You’ll need 16-18 cookies. Store-bought varieties work well. These cookies soak in the flavors and soften, creating nice layers.
– Garnish: Fresh mint leaves are great for presentation. They add a pop of color and a hint of freshness to your cake.
Step-by-Step Instructions
Preparation of Strawberries
To make the strawberries pop, you need to macerate them. Start by slicing 2 cups of fresh strawberries. Place them in a bowl and sprinkle with 1 tablespoon of granulated sugar. Mix gently to coat the strawberries.
Let them sit for about 15 minutes. This time allows the sugar to draw out the juices. The result is a sweet syrup that adds flavor to your cake.
For the best taste, use strawberries that are ripe. This step boosts the overall flavor of your dessert.
Whipping the Cream and Mascarpone
Next, let’s whip the cream. Pour 1 cup of heavy whipping cream into a bowl. Use a hand mixer or a whisk. Whip until soft peaks form. This means the cream holds its shape but is still soft and fluffy.
Now, add 1 cup of mascarpone cheese and 1 teaspoon of vanilla extract to the whipped cream. Gently fold the mixture. Make sure it is smooth and fully combined. This step creates a rich and creamy filling.
Layering the Cake
Now, it’s time to layer the cake. Start by laying 16-18 ladyfinger cookies in the bottom of a 9×9 inch baking dish. These cookies will soak up the strawberry juices, adding flavor and texture.
Spoon half of the mascarpone mixture over the ladyfingers. Spread it evenly for a nice base. Next, layer half of the macerated strawberries over the mascarpone.
Repeat the layers with the remaining ladyfingers, mascarpone mixture, and strawberries. This creates a beautiful and tasty dessert.
After layering, cover the dish with plastic wrap. Refrigerate it for at least 4 hours or overnight. This resting time helps the flavors meld and the cookies soften.
Tips & Tricks
Achieving the Best Texture
Chilling your cake is key. It helps the flavors blend and the layers set. I suggest refrigerating it for at least four hours. Overnight is even better. This gives the ladyfingers time to soak up the juices. Serve it cold for the best taste and texture.
Troubleshooting Common Issues
Sometimes, layers may not set well. If this happens, you can try adding more whipped cream. This extra cream helps firm the layers. If your cake is too sweet, mix in a pinch of salt. This balances the flavors and tones down the sweetness.
Garnishing Ideas
You can get creative with toppings. Try using whipped cream or coconut flakes for fun textures. Fresh berries on top add color and flavor. For a touch of elegance, consider adding edible flowers. They make your cake look stunning and special.
Pro Tips
- Use Ripe Strawberries: Choose strawberries that are fully ripe for the best flavor. They should be bright red and fragrant.
- Chill Your Ingredients: For a fluffier whipped cream, make sure your heavy cream and mixing bowl are well chilled before whipping.
- Let It Rest: Allow the cake to chill overnight for the best texture and flavor as it gives the ladyfingers time to absorb the moisture.
- Experiment with Flavors: Feel free to add a splash of liqueur, like amaretto or orange liqueur, to the mascarpone mixture for an adult twist.
Variations
Flavor Substitutions
You can switch up the fruit to make this cake your own. Try using berries like blueberries or raspberries. Peaches also work well and add a nice twist. Seasonal fruits like mangoes can bring a fresh taste in summer. If you prefer a dairy-free option, replace mascarpone with coconut cream or a nut-based cheese. These swaps keep the cake creamy while catering to dietary needs.
Textural Variations
Add some crunch by incorporating nuts like almonds or walnuts. Layering chocolate pieces can also add a rich flavor. If you want a different base, consider using sponge cake instead of ladyfingers. Sponge cake offers a softer bite and soaks up the flavors beautifully.
Themed Versions
Think about making themed versions for special occasions. For holidays, you can add festive colors with seasonal fruits, like cranberries for Christmas. In fall, use pumpkin spice for a twist on the classic recipe. You can also make mini versions for parties, using small cups for individual servings. Each theme can make your icebox cake feel fresh and exciting!
Storage Info
Storing Leftovers
To keep your icebox cake fresh, cover it tightly. Use plastic wrap or a lid. This helps prevent drying and keeps flavors strong. Store it in your fridge for up to three days. If you see any condensation, open the lid slightly to let moisture out.
For the best container, I recommend a glass or plastic dish with a tight seal. These materials keep the cake cool and fresh. Avoid metal containers as they can affect the taste of the dessert.
Freezing Options
You can freeze the strawberry shortcake icebox cake for longer storage. First, cover the cake well with plastic wrap. Then, place it in an airtight container. This prevents freezer burn and keeps it tasty. It’s best to freeze the cake before adding any garnish.
When you’re ready to enjoy it, take it out of the freezer. Let it thaw in the fridge for several hours. This keeps the texture nice and smooth. If you need it quicker, set it on the counter for about an hour. Just remember not to rush it, as slow thawing gives the best results.
FAQs
How long does the Strawberry Shortcake Icebox Cake last in the fridge?
The Strawberry Shortcake Icebox Cake stays fresh for about 3 to 4 days in the fridge. Store it in an airtight container to keep it safe from other smells and moisture. The strawberries may soften over time, but the flavors deepen, making it even tastier!
Can I make this cake ahead of time?
Yes! You can make this cake a day in advance. This gives the flavors more time to blend. Just remember to cover it well with plastic wrap. It will taste great when you serve it the next day!
What is the difference between Icebox Cake and traditional Strawberry Shortcake?
The main difference is how they are made. Icebox Cake uses layers of ladyfinger cookies, cream, and fruit. Traditional Strawberry Shortcake uses a biscuit or sponge cake. The texture of Icebox Cake is creamy and soft, while traditional shortcake is more crumbly and dense.
Can I use frozen strawberries instead of fresh?
You can use frozen strawberries, but they will change the texture slightly. Thaw them first and drain excess juice. They may not taste as bright as fresh ones, but they will still work well in the cake.
You’ve learned how to make a delicious Strawberry Shortcake Icebox Cake. We covered key ingredients, step-by-step instructions, and creative variations. Remember to choose the right strawberries and use pure vanilla extract for the best flavor. Pay attention to chilling time and layering for perfect texture. This dessert offers room for creativity, so feel free to make it your own. Whether for a special occasion or just a treat, this cake is sure to impress. Enjoy your baking journey and savor each bit