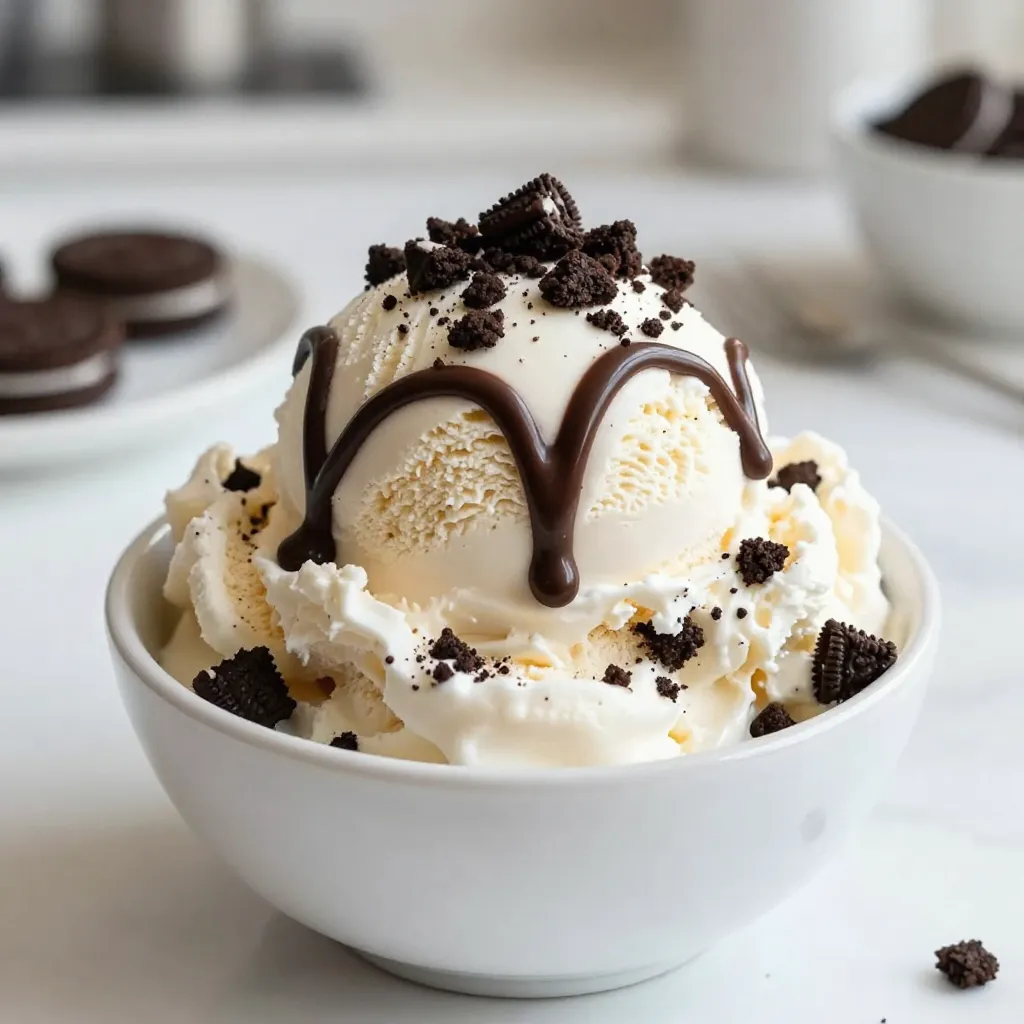
Do you crave a sweet and creamy treat that’s easy to make? You’re in luck! This No-Churn Oreo Ice Cream is a simple delight you can whip up at home. With just a few ingredients and no ice cream maker needed, you’ll enjoy the rich taste of Oreos blended into smooth, delicious ice cream. Get ready to impress your friends and family with this quick dessert that’s pure bliss in a bowl!
Why I Love This Recipe
- Decadent Flavor: This dessert combines the rich taste of cookies and cream with a creamy, dreamy texture that’s simply irresistible.
- Easy to Make: With just a few simple ingredients and no churn required, this recipe is perfect for even novice bakers.
- Perfect for Any Occasion: Whether it’s a summer barbecue or a cozy winter night, this treat is sure to please everyone.
- Customizable: Add your favorite mix-ins or toppings to make it uniquely yours, or stick with classic Oreos for a timeless delight.
Ingredients
Main Ingredients for No-Churn Oreo Ice Cream
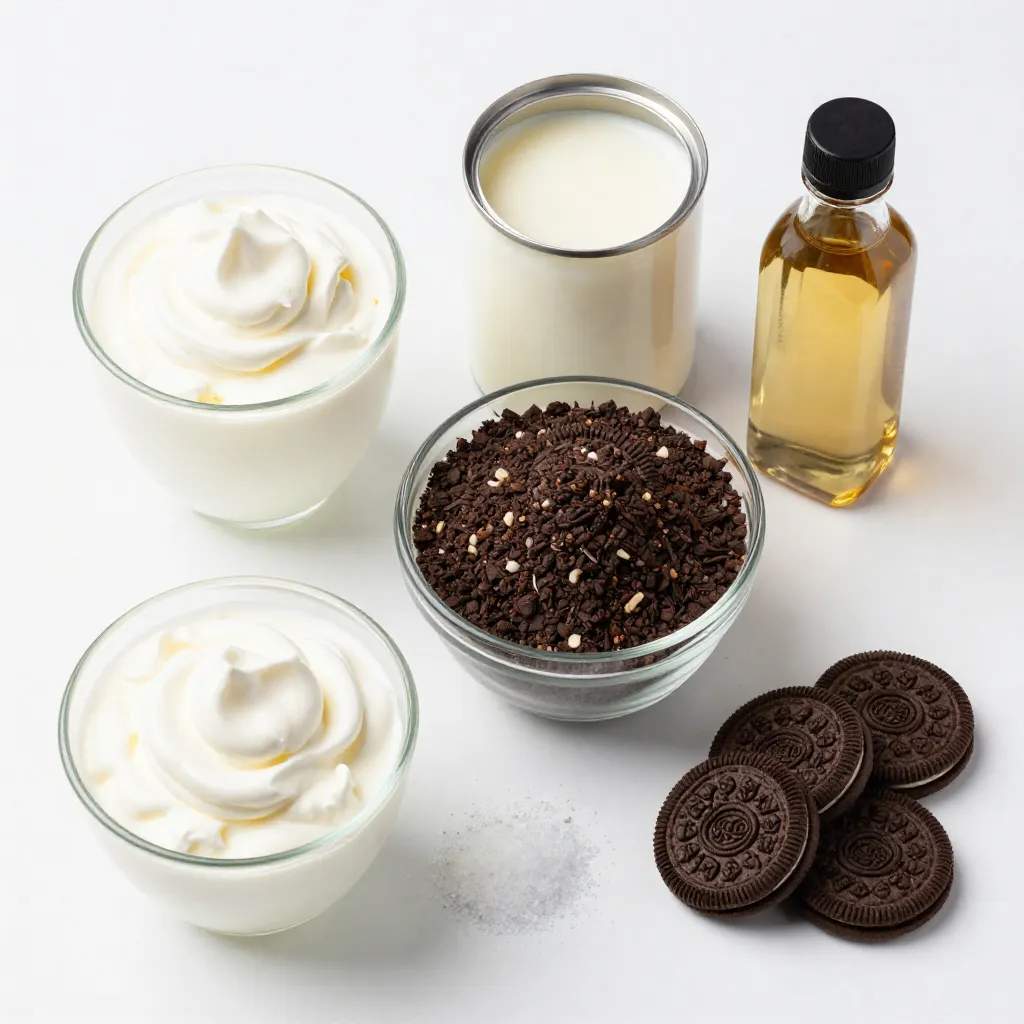
To make this creamy treat, you will need:
– 2 cups heavy cream
– 1 can (14 oz) sweetened condensed milk
– 1 teaspoon vanilla extract
– 1 cup crushed Oreo cookies (plus extra for topping)
– Pinch of salt
These ingredients come together to create a rich, smooth ice cream. The heavy cream adds creaminess. The sweetened condensed milk gives just the right sweet taste. Vanilla extract enhances the flavor, while Oreo cookies add that classic crunch.
Optional Toppings
You can dress up your ice cream with:
– Extra crushed Oreo cookies
– Chocolate sauce
– Whipped cream
– Chopped nuts
These toppings can boost your ice cream’s flavor. They add texture and fun! Use your favorites to make it your own.
Equipment Needed
For this recipe, gather the following tools:
– Large mixing bowl
– Electric mixer
– Spatula
– Loaf pan or airtight container
– Plastic wrap or a lid
Having the right tools makes the process easier. The electric mixer helps whip the cream quickly. A spatula ensures you mix gently without losing air. Choose a container that fits your freezer well.
Step-by-Step Instructions
Preparing the Whipped Cream
First, grab a large mixing bowl. Pour in 2 cups of heavy cream. Use an electric mixer on high speed. Beat the cream for about 3 to 5 minutes. You want to see stiff peaks form. This means the cream is fluffy and ready to go.
Mixing the Condensed Milk Base
Next, take another bowl. Add one can of sweetened condensed milk. Pour in 1 teaspoon of vanilla extract. Add a pinch of salt for balance. Stir gently until it all blends well. This creamy mix will be the base of your ice cream.
Combining and Folding Ingredients
Now it’s time to combine the two mixtures. Slowly fold the whipped cream into the condensed milk mix. Use a spatula and be gentle. You don’t want to deflate the whipped cream. Once combined, fold in 1 cup of crushed Oreo cookies. Save some Oreo crumbles for the top!
Freezing Process
Transfer the mix to a loaf pan or airtight container. Spread it out evenly. Sprinkle the reserved Oreo crumbles on top. Cover it tightly with plastic wrap or a lid. Place it in the freezer for at least 6 hours. Wait until it’s nice and firm before enjoying!
Tips & Tricks
How to Achieve the Best Texture
To get the best texture, whip your heavy cream well. Use a high speed on your mixer. Whip until it forms stiff peaks. This step makes your ice cream light and fluffy. Be gentle when mixing the whipped cream with the condensed milk. Folding helps keep the air in the whipped cream. It’s key for a creamy texture.
Storing Leftover Ice Cream
If you have leftover ice cream, store it in an airtight container. Cover the top with plastic wrap before sealing the lid. This helps prevent ice crystals from forming. You can keep it in the freezer for up to two weeks. Just remember to let it sit out for a few minutes before scooping. This makes it easier to serve!
Serving Suggestions
For a fun serving, scoop the ice cream into bowls or cones. Drizzle some chocolate sauce on top for added flavor. You can also garnish with extra Oreo pieces. Try adding a dollop of whipped cream for a special touch. This makes each bite a little more exciting!
Pro Tips
- Chill Your Bowl: For even fluffier whipped cream, chill your mixing bowl and beaters in the freezer for 10-15 minutes before whipping the cream.
- Use Fresh Ingredients: Make sure your heavy cream is fresh and cold for the best results in achieving those stiff peaks.
- Oreo Variations: Experiment with different flavors of Oreos, like peanut butter or mint, to create unique variations of this dessert.
- Serving Suggestions: Serve with a drizzle of chocolate or caramel sauce for added richness and visual appeal.
Variations
Adding Different Cookie Flavors
You can switch up the flavor by using other cookies. Try chocolate chip, peanut butter, or even mint cookies. Just crush them like the Oreos and mix them in. Each cookie brings its own taste. This way, you can create a new treat that fits your mood.
Swirling in Other Ingredients (e.g., peanut butter, chocolate)
Want a fun twist? Swirl in peanut butter or chocolate syrup. Add these after mixing the whipped cream with the condensed milk. Use a knife to gently swirl them in. This creates tasty ribbons of flavor. You can also add nuts or caramel for extra crunch and sweetness.
No-Churn Ice Cream Flavor Combinations
Get creative with flavor combinations! Try adding crushed fruit like strawberries or bananas. You can mix in a bit of coffee for a mocha vibe. Think of flavors that you love, and give them a try. The no-churn base works with many tastes. This makes your ice cream truly unique!
Storage Info
Best Way to Store No-Churn Oreo Ice Cream
To keep your No-Churn Oreo Ice Cream fresh, use an airtight container. A loaf pan works well too. Cover the top with plastic wrap before sealing the lid. This extra step helps prevent ice crystals.
Shelf Life and Freezing Tips
Your ice cream can last up to two weeks in the freezer. For best taste, try to eat it within a week. Always freeze it at a steady temperature. Avoid the door of your freezer, as it can get warmer.
Re-freezing Guidelines
If you need to re-freeze your ice cream, do it carefully. Avoid letting it sit out too long. If the ice cream melts partially, it can change texture. Scoop what you want, then re-cover and freeze again quickly.
FAQs
Can I use different types of cream?
Yes, you can use different creams. I recommend using heavy cream for the best texture. It whips up nicely and makes the ice cream rich. If you want a lighter version, use whipping cream. Just know that the texture may change a bit.
How long does it take to make No-Churn Oreo Ice Cream?
Making this ice cream is quick. It takes about 20 minutes to mix everything. However, don’t forget the freezing time. You need to freeze it for at least 6 hours. So, plan ahead and let it chill overnight for the best flavor.
Can I make this recipe dairy-free?
Yes, you can make this recipe dairy-free. Use coconut cream instead of heavy cream. For the sweetened condensed milk, find a dairy-free option made from coconut or almond. This will give you a yummy treat that fits your needs.
You learned how to make no-churn Oreo ice cream easily. We covered the main ingredients, essential tools, and step-by-step actions. I shared tips for texture and storage, plus fun variations to try. In the end, this simple treat can please everyone. Now, you can enjoy creamy, sweet ice cream without the fuss. Dive in and create your own version toda