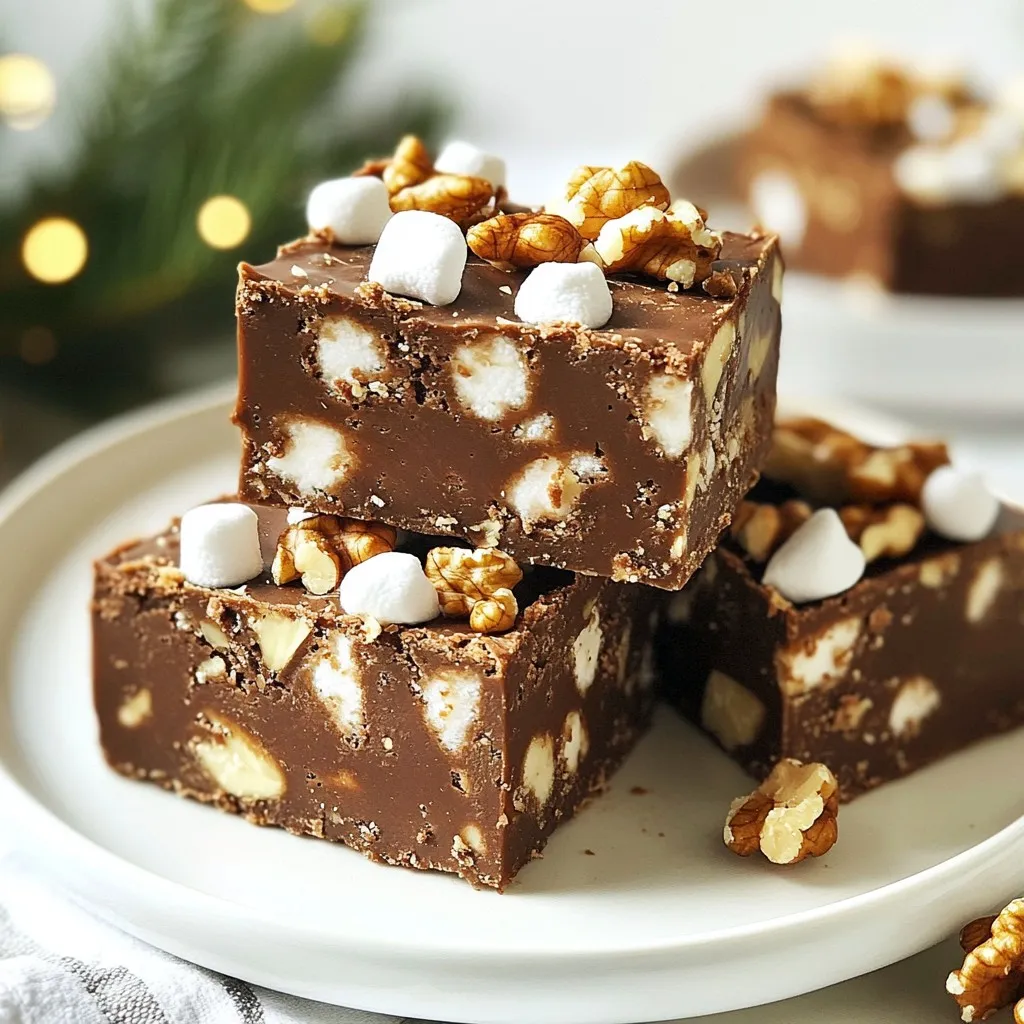
Christmas is around the corner, and that means it’s time for classic Christmas fudge! This sweet and simple recipe transforms basic ingredients into a rich, creamy treat. I’ll guide you through each step, ensuring you can whip up this festive favorite with ease. Whether you’re treating yourself or gifting a batch, this fudge is sure to impress. Ready to dive into the delicious world of fudge-making? Let’s get started!
Why I Love This Recipe
- Rich Chocolate Flavor: This fudge boasts a deep, rich chocolate flavor that perfectly captures the essence of the holiday season.
- Easy to Make: With just a few simple ingredients and straightforward steps, this recipe is accessible for all skill levels.
- Great for Gifting: The fudge makes a delightful homemade gift, perfect for sharing with friends and family during the holidays.
- Customizable: You can easily adapt this recipe by adding your favorite nuts, candies, or toppings for a personalized touch.
Ingredients
Main Fudge Ingredients
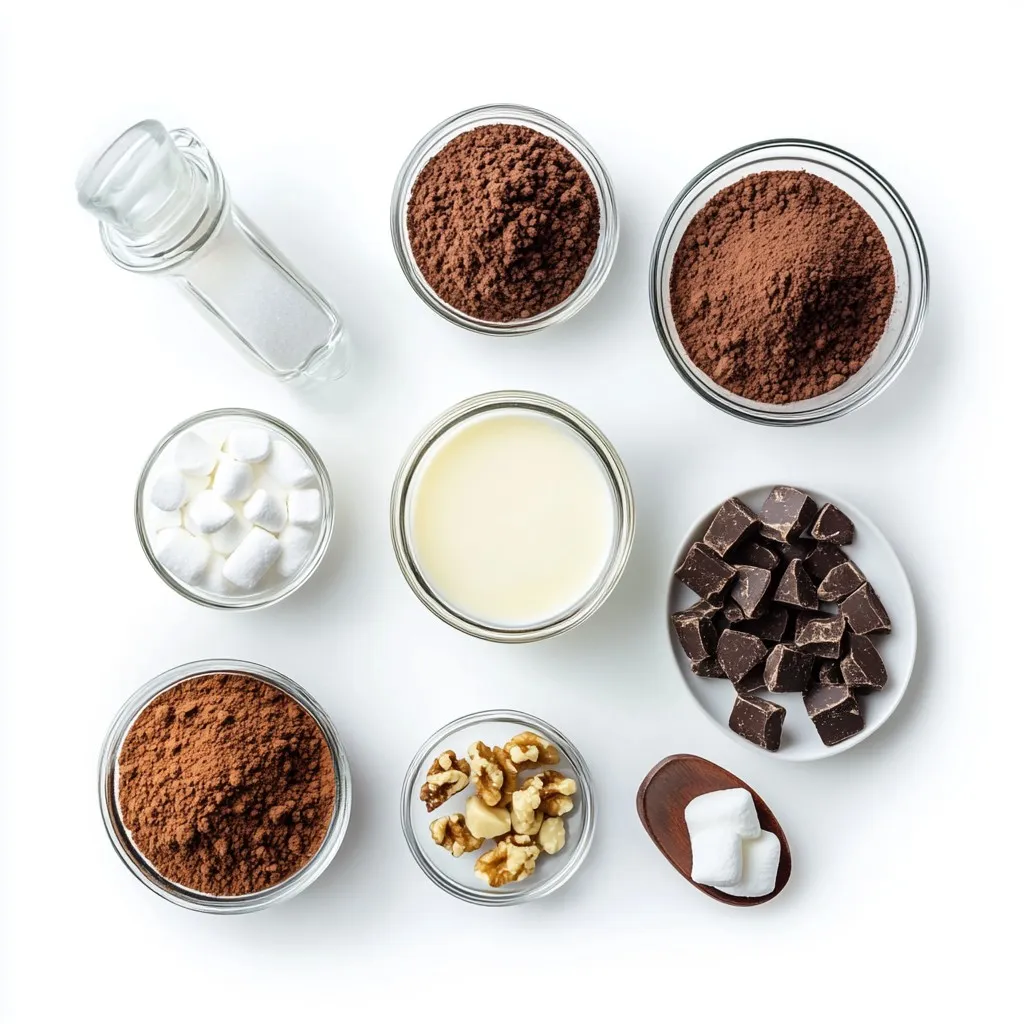
– 2 cups granulated sugar
– 1/2 cup unsweetened cocoa powder
– 1 cup heavy cream
– 1/2 cup unsalted butter
– 1 teaspoon vanilla extract
– 1/2 teaspoon salt
– 1 cup semi-sweet chocolate chips
– 1 cup chopped nuts (e.g., walnuts or pecans)
To make classic Christmas fudge, you will need a few key ingredients. Granulated sugar and unsweetened cocoa powder give the fudge its sweet and rich flavor. Heavy cream adds creaminess, while unsalted butter gives a smooth texture. Vanilla extract enhances the taste, and a pinch of salt balances the sweetness. Semi-sweet chocolate chips make it extra chocolaty, and chopped nuts add a nice crunch.
Optional Add-Ins
– 1/2 cup mini marshmallows
– Sea salt topping
You can make your fudge even more special with optional add-ins. Mini marshmallows add a fluffy texture and sweetness. A sprinkle of sea salt on top adds a lovely contrast to the sweet fudge. These options let you customize your fudge to suit your taste and impress your friends and family.
Step-by-Step Instructions
Preparing the Pan
First, take an 8×8 inch baking dish. Line it with aluminum foil or parchment paper. Make sure to leave some overhang. This helps you lift the fudge out later. Next, lightly grease the paper with cooking spray. This step keeps the fudge from sticking.
Combining the Main Ingredients
In a medium saucepan, mix together the granulated sugar, unsweetened cocoa powder, and salt. Stir them well to combine. This will be the base of your fudge. The cocoa gives it that rich chocolate flavor.
Cooking the Fudge Base
Now, pour in the heavy cream and add the unsalted butter. Stir the mixture over medium heat. Keep an eye on it until the butter melts and the sugar dissolves. This will take a few minutes. Once the butter is melted, increase the heat to medium-high. Bring the mix to a gentle boil. You want it to boil for about 4 to 5 minutes. Stir constantly. This helps the fudge reach a soft-ball stage. You will know it’s ready when it hits 235°F or 112°C on a candy thermometer.
Final Mixing and Setting
After reaching the right temperature, remove the pan from the heat. Stir in the semi-sweet chocolate chips, vanilla extract, and chopped nuts. If you like, add mini marshmallows for extra fluffiness. Keep stirring until everything is smooth and melted. Carefully pour the fudge mixture into the prepared baking dish. Spread it evenly with a spatula. Let the fudge cool at room temperature for about 2 hours. You can also chill it in the fridge to speed things up. Once it’s set, use the overhanging paper to lift it out of the dish. Cut it into squares or your desired shapes.
Tips & Tricks
Perfecting Your Fudge
– Achieving the right temperature:
To get perfect fudge, you need the right heat. Use a candy thermometer. Cook the mixture until it hits 235°F (112°C). This is the soft-ball stage. If it’s too hot, your fudge will be hard. If it’s too cool, it will be too soft.
– Stirring techniques for smoothness:
Stir the fudge mixture continuously while it cooks. This helps mix everything well and keeps it smooth. Once you add the chocolate chips, keep stirring until everything blends perfectly. No lumps allowed!
Gift Packaging Ideas
– Creative ways to present fudge as gifts:
Fudge makes a great gift! Cut it into nice squares and arrange them in a festive box. You can even add a handwritten note to make it special.
– Using decorative boxes or containers:
Choose colorful boxes or jars to hold your fudge. You can also line the insides with parchment paper. This adds a nice touch and keeps the fudge fresh.
Making Fudge Ahead of Time
– Storing tips for holiday preparedness:
You can make fudge days in advance. Just store it in an airtight container. Keep it at room temperature. It will stay fresh for up to two weeks. If you want to keep it longer, freeze it. Just thaw it in the fridge before serving.
Pro Tips
- Use a Candy Thermometer: To achieve the perfect soft-ball stage, using a candy thermometer ensures that your fudge has the ideal consistency.
- Experiment with Flavors: Feel free to add flavor extracts like almond or peppermint to personalize your fudge and make it unique.
- Choose Quality Chocolate: The taste of your fudge relies heavily on the quality of chocolate chips you use, so opt for high-quality semi-sweet chocolate for the best flavor.
- Storage Tips: For longer shelf life, consider refrigerating the fudge. Just make sure it’s stored in an airtight container to prevent it from drying out.
Variations
Peppermint Christmas Fudge
For a festive twist, you can make peppermint fudge. It has a lovely minty flavor. Here are the needed ingredients:
– 2 cups granulated sugar
– 1/2 cup unsweetened cocoa powder
– 1 cup heavy cream
– 1/2 cup unsalted butter
– 1 teaspoon vanilla extract
– 1/2 teaspoon salt
– 1 cup semi-sweet chocolate chips
– 1 cup crushed peppermint candies
Steps:
1. Prepare the pan just like before.
2. Mix the sugar, cocoa powder, and salt.
3. Pour in heavy cream and add butter. Stir until melted.
4. Boil until it reaches soft-ball stage, about 4-5 minutes.
5. Remove from heat and add chocolate chips and vanilla.
6. Stir in crushed peppermint candies until well mixed.
7. Pour into the pan and spread evenly.
8. Cool at room temperature for 2 hours.
9. Cut into squares and enjoy your peppermint fudge!
Gingerbread Fudge
Gingerbread fudge brings warm spices to your holiday treats. It tastes like Christmas in every bite. Gather these ingredients:
– 2 cups granulated sugar
– 1/2 cup unsweetened cocoa powder
– 1 cup heavy cream
– 1/2 cup unsalted butter
– 1 teaspoon vanilla extract
– 1/2 teaspoon salt
– 1 cup semi-sweet chocolate chips
– 1 tablespoon ground ginger
– 1 teaspoon ground cinnamon
– 1/2 teaspoon ground nutmeg
Steps:
1. Line your pan as usual.
2. Combine sugar, cocoa powder, salt, ginger, cinnamon, and nutmeg.
3. Add heavy cream and butter. Stir until smooth.
4. Bring to a boil for 4-5 minutes.
5. Remove from heat and mix in chocolate chips and vanilla.
6. Pour into the pan and smooth the top.
7. Let it cool for 2 hours.
8. Cut into squares and enjoy this spiced treat!
Nut-Free Alternatives
If you want to skip the nuts, it’s simple! You can still have great fudge. Here are some tips:
– Omit the chopped nuts from the classic recipe.
– Use mini marshmallows for a fun texture.
– You might also add extra chocolate chips for richness.
– Make sure to read labels on chocolate for safety.
These nut-free options will still give you creamy, delicious fudge. Enjoy making your favorite holiday treats without any worries!
Storage Information
Best Storage Practices
To keep your Classic Christmas Fudge fresh, use an airtight container. This helps keep moisture out. Make sure the fudge is fully cool before you store it. Place a piece of wax paper between layers if you stack pieces. This helps to prevent sticking.
Shelf Life of Classic Christmas Fudge
When stored properly, your fudge lasts up to two weeks at room temperature. Keep it in a cool, dry place. If you notice any changes in texture or smell, it might be time to toss it. Fudge can also last longer in the fridge, extending freshness for about three weeks.
Freezing Instructions
Freezing fudge is a great way to save it for later. First, cut the fudge into squares. Wrap each piece tightly in plastic wrap. Then, place them in a freezer-safe bag or container. Label it with the date. Fudge can stay fresh in the freezer for up to three months. When you’re ready to enjoy, let it thaw at room temperature for a few hours. Enjoy the same great taste!
FAQs
What is the best way to cut fudge?
To cut fudge easily, chill it first. After it sets, use a sharp knife. Clean the knife between cuts for neat squares. If the fudge sticks, run the knife under warm water. This helps make clean cuts and keeps the fudge looking nice.
How can I make fudge without a thermometer?
You can check the fudge’s doneness with the cold water test. Drop a little fudge into cold water. If it forms a soft ball, it is ready. Another method is to watch for bubbles. When it boils steadily, it’s close to the right stage.
Can I use other types of chocolate?
Yes, you can use milk or dark chocolate for a different taste. Milk chocolate gives a sweeter fudge. Dark chocolate adds a rich flavor. You can also mix chocolates for unique results. Experiment to find what you love best!
Why is my fudge grainy?
Grainy fudge often comes from sugar not dissolving. Stir the mixture well while cooking. Avoid boiling too fast, as it can cause sugar crystals. If it happens, try reheating and stirring again to smooth it out.
Making fudge is simple and fun. We discussed the key ingredients, step-by-step instructions, and tips for success. You learned about exciting variations and storage methods too. Remember, using quality ingredients leads to better fudge. Pay attention to temperature for that perfect texture. Whether as a treat or gift, fudge adds joy to any occasion. Now, with this guide, you can create delicious fudge at home. Enjoy your baking and share your sweet creations with friends and famil